
Your alarm goes off at 2 AM. You’re in high camp, and once you unzip the tent, snowflakes drift down through the beam of your headlamp. Not exactly what you would hope, but the weather report says this narrow window is all you can expect.
So you jam your feet into boots that are essentially frozen solid, clip into your harness, and stroll out onto a slope that just … drops. Three thousand feetNine hundred meters straight down into nothing but darkness. That’s mountaineering. And yeah, it’s a totally different animal from a backpacking trip you did last summer.
I have been in this for six years now. Climbed throughout North America – some of the standard Colorado fourteeners, and then graduated to the multi-day glacier routes up in the Cascades.
I’ve also bailed on climbs. A lot. Like 500 feet150 meter from the summit on Rainier when visibility just disappeared, or Shasta when my climbing partner started acting weird and I knew altitude sickness was starting to show. Mountaineering is serious business, and there are a few things you really should know before your first mountain attempt.
How it’s different from hiking, the true risks (not the Instagram, you know), preparing your body and head, the actual skills you’ll need, the gear that’s worthy of purchase, and where to even begin with all this. I wished I’d had a complete mountaineering guide before my first attempt, that’s why I’m putting this one together for you. That being said, it’s time to dive in.
What Is Mountaineering?
Mountain climbing sits at the intersection of hiking, rock climbing, and survival skills. Where a hiking trail ends at a viewpoint, a mountaineering route often begins, pushing through snow, navigating glaciers, and sometimes roping up for technical terrain that would kill you if you slipped.
The Three Terrains: Rock, Snow, and Ice
Mountains throw three types of terrain at you, and most routes hit all of them before you’re done.
Rock comes in a lot of flavors. Sometimes you’re just scrambling, hands and feet, moving fast, no big deal. Other times, you’re straddling a ridge the width of a dinner plate with a thousand feet of nothing on both sides.
I watched a guy freeze up on Capitol Peak’s Knife Edge once. Strong hiker, crushed the approach, totally confident. Then he looked down and just… stopped. We stood there for twenty minutes while he worked up the nerve to move again. I’ve been that guy. More than once, if I’m being honest.
Snow is the postcard version of mountaineering: steep white slopes, crampons, the whole thing. What the postcards leave out is how fast conditions change.
You’re kicking steps into perfect firm snow at 5 AM, feeling great. By noon, that same slope is either mush or it’s sliding. Avalanche terrain shows up on routes nobody thinks of as avalanche routes. That part took me a while to learn.
Steep ice is a different sport. Ice tools, front-pointing, the whole deal. You won’t run into much of it on beginner climbs. For instance, I didn’t really think about glacier travel until I signed up for Baker and realized oh, right, there’s a massive river of ice between me and the summit.

Rainier, Shasta, all the Cascade volcanoes, same deal. You’re roping up and crossing crevasse fields even on the “easy” routes.
Mountaineering vs. Trekking vs. Alpinism
| Gear | Terrain | |
|---|---|---|
| Mountaineering | Crampons, ice axe, rope, harness | Snow, glaciers, scrambling |
| Trekking | Boots, trekking poles, maybe gaiters | Trails, some off-trail |
| Alpinism | Full rack, technical tools like quickdraws | Steep rock, ice, mixed |
I used to mix these up constantly.
So, walking to Everest Base Camp is a trek. A hard one, but still. Going up Mount Everest itself or Kilimanjaro is expedition mountaineering. And those guys soloing frozen waterfalls in the Canadian Rockies in January are alpine climbing, which is a whole level I haven’t touched yet.
Crampons and an ice axe are usually where I draw the line. Once those come out, you’re no longer trekking but mountaineering or alpine climbing.
Related article: Alpinism vs. Mountaineering
Alpine Style vs. Expedition Style

Alpine style means carrying everything you need on your back and moving fast, climbing a route in a single push or a few days. It’s riskier but more elegant. Most weekend objectives in the lower 48 use alpine style.
Expedition style involves establishing a series of camps, ferrying loads up the mountain, and acclimatizing gradually over weeks. Base camp serves as your logistics hub. Think Denali Mountain or Everest expeditions. This approach reduces risk but requires massive time and resource commitments.
For your first climbs, you’ll use alpine style on two or three-day outings. But understanding expedition style helps you decode trip reports and plan for bigger objectives down the road.
Understanding Route Grades

Before you even start looking for routes for your mountaineering adventure, let’s decipher grades, so you know what you’re getting into.
Yosemite Decimal System
The Yosemite Decimal System covers rock terrain.
Class 1 is just a trail, and Class 2 means you’re using your hands for balance, hopping over boulders. Class 3 is where things get real because you’re on steep, exposed rock, and a fall is going to hurt. Class 4 is the gray zone where most people want a rope because a fall could kill you. Class 5 is full technical climbing with protection and belays.
The thing that confused me early on: when a route says “Class 3 with a Class 4 step,” it means mostly moderate scrambling with one section that’ll get your attention. The rating always reflects the hardest move, not the average difficulty.
Class 5 breaks down further into decimal points. 5.0 to 5.4 is beginner terrain you might toprope your first day at a crag, 5.5 to 5.7 is moderate, and by 5.10, they start adding letters because the jumps between grades get smaller. Most mountaineering routes max out around 5.6 or 5.7, so if you can comfortably climb 5.7, you’ll handle almost any standard route in the lower 48.
WI Grades
That’s for water ice. WI1 is low-angle stuff you can nearly walk up, and WI2 is steeper, maybe 60-70 degrees, where you’re front-pointing and swinging tools but nothing desperate. WI3 goes vertical, and anything above that is for dedicated ice climbers.
Distance
Longer routes also carry commitment grades from I to VI. Grade I takes a few hours, Grade III is a full day, and Grade V means you’re sleeping on the mountain. So when you see “Grade III, Class 4, WI2,” you know what you’re signing up for: a dawn-to-dark day with serious scrambling and ice travel.
The Reality of Risk

I’m not going to pretend mountaineering is safe. People die in the mountains every year, and I’ve lost one acquaintance to this pursuit. But understanding risk – really understanding it – is what separates careful mountaineers from reckless ones.
Objective vs. Subjective Hazards
Objective hazards exist regardless of your skill level. Rockfall from cliffs above you. Avalanches triggered by temperature changes. Hidden crevasses on glaciers. Lightning storms that build without warning. You can minimize exposure to these hazards, but you can’t eliminate them.
Subjective hazards come from your own decisions. Poor route-finding. Inadequate fitness. Pushing past your skill level. Continuing when you should turn around. These are the hazards you actually control.
Yet, from my experience, subjective hazards kill more people than objective ones. Crevasse falls usually happen because someone wasn’t roped up properly or ignored obvious warning signs. Avalanche deaths often involve parties who saw the red flags but convinced themselves it was fine.
What the Data Says
You might expect technical falls to be the leading cause of accidents, but the data proves otherwise. The American Alpine Club analyzes over 100 incidents annually, and the 2024 report points the finger at a quieter culprit: “moderate” terrain.
When the climbing feels easy, we tend to let our guard down. That is when minor errors (a trip on loose rock or a moment of inattention walking off a peak) turn into major rescues. Underestimating the descent is a classic mistake.
Avalanches are the other major killer to watch for. According to the Colorado Avalanche Information Center, about 27 people a year die because of slides in the US. In almost every single case, the climber or skier triggered the slide that caught them. You can reduce your risk by reading an avalanche safety guide before going into terrain with avalanche risk.
Summit Fever and Groupthink
The most dangerous hazard in the mountains is between your ears.
Summit fever is the irrational drive to reach the top after you’ve invested significant time and energy. You start rationalizing: “The weather might hold.” “We’re so close.” “We can move fast.” I’ve caught myself doing this, already composing the summit photo caption while ignoring the clouds building to the west.
Groupthink happens when a team collectively makes decisions that individuals would reject. Nobody wants to be the person who calls off the climb. Everyone assumes someone else would speak up if it were really dangerous. It takes practice to voice concerns even when you’re not certain.
Decide your turnaround time before you start climbing. “We turn back at noon regardless of where we are.” Having a preset rule removes the emotional decision-making when summit fever kicks in.
Why Mountaineers Wake at 2 AM
The alpine start might sound like machismo, but it’s actually risk management. Snow that’s firm at dawn becomes unstable mush by afternoon as temperatures rise. Rockfall increases as ice melts and releases debris. Afternoon thunderstorms build predictably in mountain ranges throughout summer.
Starting early means you’re on the exposed summit ridge when conditions are safest and descending back to camp before the daily hazard cycle peaks. It’s miserable to leave a warm sleeping bag in the dark. But that discomfort is the price of coming home.
Physical and Mental Preparation

You can’t buy lungs at the gear shop. It doesn’t matter if you’re wearing $600 boots; if your legs quit at 12,000 feet,3660 meter, you’re done.
Building the Engine
Mountaineering has very little to do with gym strength. In fact, many of my friends who hit the gym regularly admit they lack the ability to trudge uphill for hours at low oxygen levels.
What many mountaineers are using instead is the Uphill Athlete method from Steve House and Scott Johnston. Their philosophy says you need to spend most of your time in what they call “Zone 2”, a pace easy enough that you can hold a conversation.
This builds a massive aerobic base without wrecking your body. Once you have the base, you add a 30-to-50-pound14-23 kilogram pack to simulate the real thing.
If you’re eyeing a glaciated peak like Mount Baker, give yourself three to six months. Start with three or four sessions a week and ramp up the vertical gain. I’ve found that nothing beats stair climbing with a weighted pack. Find a tall building, climb until your quads burn, then do it again.
Also, don’t neglect the downhill. Descending 3,000 feet915 meter on tired legs destroys knees faster than climbing builds them. You have to train your body to handle the braking forces of the descent.
The Reality of Altitude

Above 8,000 feet2440 meter your body starts doing weird things. Less oxygen in every breath, so your heart works harder and you’re breathing faster just walking uphill.
Acute Mountain Sickness shows up as a headache plus some other garbage like nausea or dizziness or feeling completely wiped out. The Wilderness Medical Society puts the threshold around 8,200 feet.2500 meter. I got hit with it on a fourteener in Colorado even though I’d been living in Denver for months and figured I was fine. Woke up at camp feeling like I had a hangover without the fun part.
If you ignore AMS it can turn into HAPE or HACE, which is fluid building up in your lungs or brain. People die from this.
The standard advice is don’t increase your sleeping elevation more than 1,650 feet503 meter per day once you’re above 9,800 feet.3000 meter. Diamox helps some people, but it’s not a guarantee.
And altitude tolerance is mostly genetic, which is annoying. I’ve watched guys in their fifties cruise past twenty-year-olds who were bent over on the trail trying not to puke. You really don’t know how you’ll handle it until you get up there.
Embracing the Sufferfest
We call it “Type 2 fun” – miserable while it’s happening, but a great story later. That is mountaineering in a nutshell. You will be cold. You will be scared. You will question your life choices at 3 AM on a dark snow slope. But that mental callus is just as important as your aerobic base. Train for it by camping in bad weather or pushing through long days when you’d rather quit.
The golden rule for adaptation is “climb high, sleep low.” Push your body into thin air during the day, then drop down to recover at night. For weekend trips where you can’t acclimatize for weeks, just hydrate, skip the alcohol, and be honest with yourself. If you feel sick, go down. The mountain will be there next week.
Essential Mountaineering Skills: The Toolbox
Gear won’t save you. Competence will. I’ve watched climbers with $3,000 worth of brand-new kit make terrifying rookie errors, while scrappy women in thrifted layers moved through serious terrain with total confidence. Put your money into education, not just mountaineering equipment. Always.
Snow Travel and the Art of Stopping
Think of your ice axe as a brake, not a hiking stick. We call it “self-arrest,” but really, it’s a desperate move to stop a slide. You drive the pick into the slope, throw your weight onto it, and pray friction wins before you hit the rocks or a crevasse.
It sounds straightforward, but under panic, muscle memory is the only thing that works. You have to practice this on safe, moderate runouts until it’s automatic. Head-first, on your back, stomach, practice every awkward angle, because gravity rarely plays nice.
Better yet? Don’t fall. Trusting your crampons, placing your feet with intention, and reading the snow matters infinitely more than your arrest skills. The best self-arrest is the one you never have to use.
Rope Skills: The Non-Negotiables
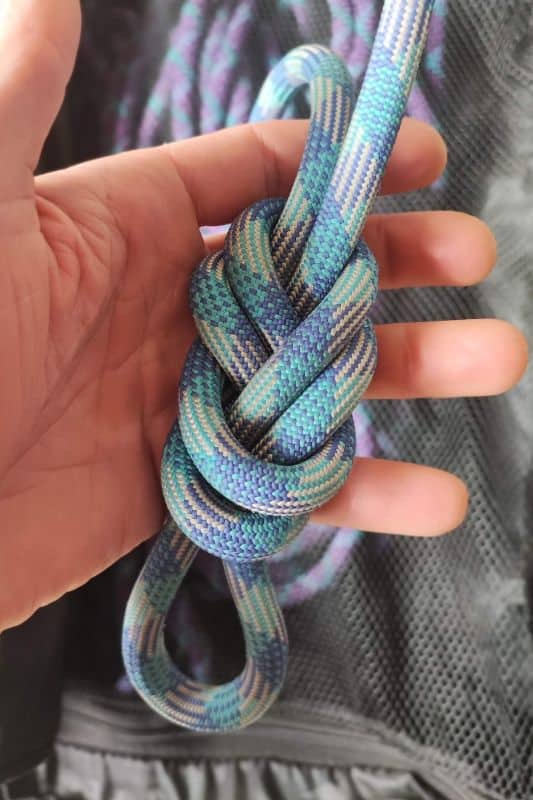
Even on “non-technical” routes, ropes are often life-safety tools for glaciers or tricky steps. You don’t need to be a 5.12 climber, but you do need a few knots dialed cold.
- Essential knots: The figure-8 ties you in. The clove hitch anchors you fast. The prusik knot is your friction hitch for climbing the rope or building a rescue haul. Learn these until you can tie them in the dark, with gloves on, while shivering.
- Belaying basics: This is just managing the rope to catch a partner. Modern devices help, but habits, like never letting go of the brake hand, staying alert, clear communication, need to be second nature.
- Rappelling: Sliding down the rope on friction. It’s how we retreat. The mechanics are simple, but mistakes here are usually fatal.
A basic mountaineering course covers this. Repetition makes it stick. I still practice my prusiks in the living room every season; dangling in a crevasse is a terrible time to remember how friction hitches work.
Also, know when NOT to rope up. On moderate terrain, a rope can turn a solo stumble into a team tragedy. If you can’t anchor or arrest a fall effectively, moving unroped is often the safer, smarter call.
Avalanche Savvy
Avalanche terrain isn’t seasonal. Spring corn slides. High-altitude summer snowfields slide.
Before buying the rescue gear, buy the education. An AIARE Level 1 course is 24 hours well spent learning to read the mountain. It teaches you to avoid the hazard entirely, which is the only 100% effective strategy.
Your beacon, probe, and shovel are for when things have already gone wrong. The hard truth? Survival rates plummet after 15 minutes of burial. I carry the gear, but I plan my routes to never need it.
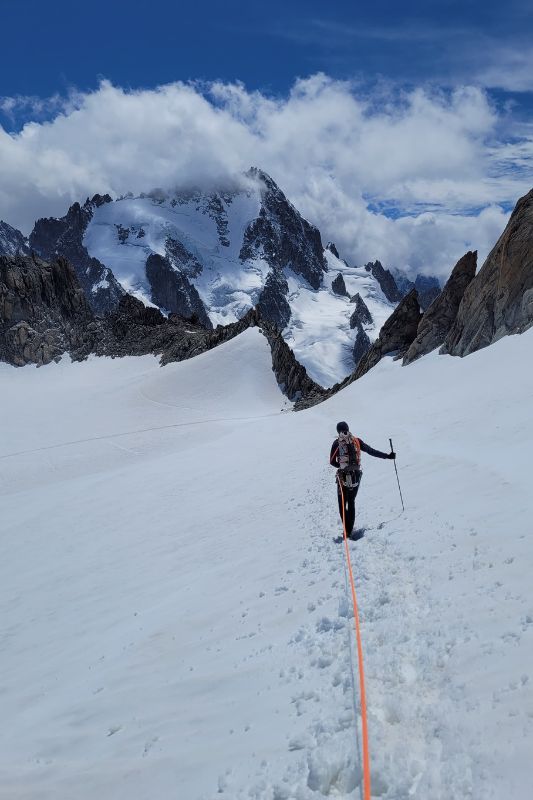
Glaciers and the Hidden Void
Glaciers are rivers of ice, hiding deep cracks under thin snow bridges. Step wrong, and you could drop 100 feet30 meter into the blue.

We use roped team travel to manage this. By spacing out (2-4 climbers), the team becomes the anchor if a bridge collapses. The rope is also your hoist for getting someone out.
You need hands-on instruction for this. Crevasse rescue is complex geometry and physics; trying to figure it out on the fly is dangerous. If your objective has glaciers, don’t skip the formal training.
Navigation in the White Room
GPS changed the game, but batteries die and screens freeze. Treat electronics as a luxury backup, not your primary brain.
In a whiteout, when the sky and snow merge into gray soup, GPS often struggles to keep up. Sometimes we place wands (bamboo flags) on the way up. It feels tedious until you’re descending in a storm, and those little flags are the only breadcrumbs leading home.
Leave No Trace in the Alpine

The high alpine is fragile. Tundra takes decades to heal from a boot print. Leave No Trace isn’t just a suggestion; it’s our code.
This includes waste. Many routes require WAG bags (packing out human waste). Even if it’s not required, do it anyway. Keeping the snow pristine for the next team is just good style.
Mountaineering Gear 101: The System

A beginner’s full mountaineering kit costs $1,500 to $3,000, but you can get started for much less. Rent the big-ticket items first: plastic double boots, technical axes, and winter tents. Buy the personal items: layers, gloves, and well-fitted boots once you know your foot shape.
Boots: The Foundation
Mountaineering boots aren’t just hiking boots with crampons. They’re stiff, insulated, and designed to interface with technical equipment. The stiffness rating matters immensely for safety and energy conservation:
- B1 boots: Flexible enough for hiking but stiff enough for strap-on crampons. Good for non-technical peaks and long approaches, but they will flex and pop off technical crampons during steep ice climbing.
- B2 boots: The workhorse. They offer a stiff sole for “front-pointing” (kicking toes into snow) but have enough rocker to walk comfortably. They work with semi-automatic crampons (heel clip, toe basket). This is the sweet spot for 90% of objectives in the lower 48.
- B3 boots: Completely rigid. Designed for vertical ice and extreme cold. They are miserable to hike in on dry trails, but essential for technical alpine routes where calf fatigue is a danger.

Now, let’s talk about fit. When trying them on, kick a wall hard. If your toes hit the front, you will lose toenails on the descent. Size up a half or full size to accommodate swelling and thick wool socks.
Also, understand the difference between Single and Double boots. Single boots are lighter and precise (great for the Cascades in summer). Double boots have a removable inner liner, crucial for drying out gear in a sleeping bag on multi-day trips like Denali or winter ascents.
Check out our complete outdoor footwear guide to learn how to select your boots.
Traction: Crampons vs. Microspikes
Microspikes are pocket-sized chains with small points. They are excellent for icy approaches and flat glaciers, but become dangerous on angles over 20 degrees. If a slip would result in a slide you couldn’t stop, spikes are the wrong tool.
Crampons have 10-12 long spikes and come in specific materials for specific jobs:
- Steel: Heavy but durable. Mandatory for mixed terrain (rock and ice). If you walk on rocks with aluminum crampons, you will dull them instantly.
- Aluminum: Ultralight. Perfect for ski mountaineering or pure snow approaches, but they will bend or break on rock. Start with steel.
Crucial detail: Anti-balling plates. Ensure your crampons have these plastic bubbles on the bottom. They prevent wet snow from clumping up and sticking to the metal. Without them, you end up walking on slippery snowballs, which effectively turns off your traction, a common cause of accidents.
Binding systems:
- Strap-on: Universal fit, but time-consuming to put on.
- Semi-auto (Hybrid): Uses a heel clip and a toe strap. Fast, secure, and fits B2/B3 boots.
- Fully-auto (Step-in): Metal bail on toe and heel. For rigid B3 boots only.
More on how to attach crampons to your boots in our dedicated guide.
For a detailed comparison, see our guide to crampons vs. microspikes.
Consider Snowshoes
Deep powder approaches will wreck you without snowshoes because you’re sinking to your thigh every single step. I did the approach to Camp Muir once without them when I should have brought them, and I was completely cooked before the real climbing started. Dumb mistake. You switch to crampons when things get steep or the snow hardens up, but those long flat miles through soft snow are exactly where snowshoeing saves your legs for the actual climb.
We explain all about snowshoes in our Snowshoes Buyer Guide.
The Sharp End: Ice Axes, Harnesses, and Helmets

Ice Axes: The old rule (“it should touch the ankle”) is outdated. A shorter axe (22-24 in56-61 cm) is more maneuverable for self-arrest and steep climbing.
- Walking Axe: Straight shaft, aluminum. Primarily for balance and stopping falls.
- Technical Tools: Curved shaft, ergonomic grip. For vertical ice.
- Leash vs. Leashless: Beginners should use a leash so they don’t drop their safety tool. As you advance, you’ll likely ditch it for freedom of movement.
Harnesses: Mountaineering harnesses are distinct from gym climbing harnesses. They act like a diaper: you can put them on while keeping your feet on the ground (crucial when wearing crampons or skis). They have fewer gear loops and absorb less water.
Carabiners: These are the connectors that make everything else work. Your belay device clips to your harness with one, your rappel system needs them, glacier travel setups use them. For a basic mountaineering kit I carry at least three or four locking carabiners and a handful of non-lockers.
Helmets: These protect against rockfall and ice chunks dislodged by mountain climbers above you, a constant threat in gullies. Look for “MIPS” technology or side-impact protection, as falling into rocks is as common as rocks falling on you. I’ve been hit by falling ice more times than I can count; a helmet turns a medevac situation into a funny story.
Mountaineering Clothing: The Action Suit & Extremities

Layering is about moisture management, not just warmth.
- Base: Merino wool (warm when wet, fights odor) or synthetic (wicks fast). Cotton kills; leave it at home.
- The “Action Suit”: This is your softshell layer. You put it on at the trailhead and leave it on all day. It blocks wind and snow but breathes enough that you don’t overheat.
- The “Belay Parka”: A massive, oversized puffy jacket (down or synthetic) that fits over your shell. You throw this on immediately when you stop to rest or belay to trap heat.
- Hardshell: Your emergency armor. Gore-Tex or similar waterproof-breathable fabrics. Only for wet precipitation or howling winds.
Don’t forget the extremities:
- Gloves: Use a three-tier system. A thin liner glove for dexterity (tying knots), a mid-weight work glove for climbing, and a heavy waterproof gauntlet mitten for emergencies. Never have just one pair; wind blows gloves away constantly.
- Eye protection: Snow blindness is effectively a sunburn on your corneas. It feels like sand in your eyes and can blind you for 48 hours. You need glacier glasses (Category 4 tint) or goggles with 100% UV protection that wrap around the sides of your face. Regular sunglasses let light in the sides, which is enough to damage your eyes on a bright glacier.
- Gaiters: These seal the gap between boot and pant. On a beginner trip involving “post-holing” (sinking deep into soft snow), they are the difference between dry feet and frostnip.
Where to Start? The Mountains that Won’t Kill You for Being Green
Look, you need peaks that teach you actual alpine skills without being completely unforgiving. Real hazards, real decisions, but with enough margin that a screwup doesn’t end in a body bag.
Baker is where most people should start

Mount Baker sits at 10,781 feet,3286 meter, and it’s honestly the best first glaciated peak you can pick in the lower 48. The standard routes (Easton Glacier, Coleman-Deming) give you huge vertical without getting overly technical. You’ll rope up, walk on glaciers, navigate around crevasses. Slopes rarely push past 35 degrees.
But keep in mind that this is a two-day climb. You’re camping on snow, usually at the Hogback or somewhere near Black Buttes. Which means you’re figuring out how to melt and purify water, how to keep your tent from turning into a condensation nightmare, how to actually sleep when it’s cold.
Mount Adams tests you

The South Spur route at 12,281 feet3743 meter is just a brutal grind, over 6,000 feet1830 meter of ascent on snow and volcanic scree. Non-technical, but it’ll humble you physically. Great for dialing in crampon technique and self-arrest practice since there aren’t glaciers complicating the main route.
The descent is famous for this ridiculous 2,000-foot610 meter glissade. Super fun if you know how to control your speed with an ice axe. Less fun if you don’t and hit rocks going 30mph.50 kmph. Permits are cheap, maybe $20-50.
Then there’s Rainier

14,411 feet.4392 meter. Most glaciated peak in the lower 48. The weather here doesn’t care how skilled you are; it shuts down teams constantly. Going from Adams to Rainier is a massive jump. You need solid crevasse rescue skills or you’re asking for trouble.
Colorado 14ers when there’s still snow on them
Summer fourteener season is crowded and dusty and honestly kind of boring. But catch these peaks in May or June with spring snow, and you’ll have a completely different experience.
Quandary Peak’s East Ridge in summer is basically a hiking highway. In May, it’s a legitimate snow climb; upper face holds snow well, gives you about 1,000 feet305 meter of crampon work. The ridge itself is relatively safe, but both flanks are serious avalanche terrain. Don’t wander off the ridgeline.
Grays and Torreys make a classic combo, and you can link them via the saddle between them. But the standard summer trail crosses right under this huge avalanche path off Kelso Mountain. In winter and early spring, that crossing is a death trap. You need to actually understand avalanche forecasts, know when the snow’s consolidated enough to cross safely. Usually, that’s early morning in late spring.
Mount Washington will teach you about turning around
Don’t let the 6,288-foot1917 meter elevation fool you. This peak in New Hampshire is statistically one of the deadliest mountains in America. Accessibility plus wildly erratic weather equals a lot of rescues and some deaths.
The mountain’s real lesson is about “The Turnaround” or knowing when to bail. Weather goes from clear to 80mph129 kmph winds and complete whiteout in half an hour sometimes.
Reading the signs early enough to retreat before it hits you – that’s the skill that keeps you alive long-term in the mountains. Winter routes like Lion Head or Tuckerman Ravine are also the only place in the East to learn real ice axe and crampon skills.
What to Do if You Get Stuck

So you’re on a route and suddenly nothing looks right. The snow got steeper than the trip report said it would, or you’re staring at rock that’s way looser than you expected, or the clouds rolled in and now you can’t tell which direction camp is.
If you’ve got a rope team, talk before anybody does anything. I’ve seen people get yanked off their feet because their partner moved without warning and the rope went tight at the wrong moment.
If you’re alone, sit down. Get an anchor in if the terrain allows it. Eat something, drink some water, and wait until your hands stop shaking before you make any decisions.
Sometimes the answer is waiting. Weather clears, snow firms up, light gets better. I’ve burned two hours on a ledge waiting for clouds to lift so I could see where I was going. Felt stupid at the time, felt smart later.
If nothing looks survivable and you can’t move safely in any direction, this is what your PLB or satellite messenger is for. I started carrying one after that Cascades trip. Activating it feels like admitting defeat, but search and rescue would rather come get you off a ledge than recover a body at the bottom of it.
Learn what to do if you witness a mountain accident.
Pay Someone to Teach You
My honest advice? Hire a guide for your first few climbs. You’re compressing years of trial-and-error into a few structured days.
When you’re looking at guide services, don’t just shop for the cheapest option. Look for AMGA certification. American Mountain Guides Association means they’ve passed rigorous testing in rock, alpine, and ski disciplines. IFMGA is even better, that’s the international standard. These are the people who actually know what they’re doing.
A 3-day course might run $800. Hospital bill for a broken ankle is $5,000. Funeral costs are around $10,000. Professional instruction is cheap insurance. Plus guides know all the beta (efficient systems, local weather quirks, hidden tricks) that never make it into guidebooks.
Getting Down Matters More than Getting Up

You’ve probably heard this before, but it’s worth repeating: the summit is optional, getting down isn’t. Reaching the top means absolutely nothing if you can’t make it back safely. Keep that in your head as you start getting into this.
Pick one thing to work on this month. Maybe sign up for an AIARE course. Or just practice tying knots until you can do them without thinking. Find a local peak with some spring snow and see how your body handles elevation. The mountains will still be there next year and the year after that, no need to rush any of this.
When you’re actually ready to start buying gear, we’ve got more mountaineering guides that’ll help you avoid wasting money on the wrong stuff. And if you end up standing on your first summit, wondering what comes next, that’s when things get really interesting.
See you up there.
Frequently Asked Questions
Nope. Tons of classic mountaineering routes are basically walk-ups on snow and moderate terrain. That said, rock skills open up a lot more options. If you’re comfortable on 5.7 or 5.8 rock, way more routes become accessible.
Sherpa is an ethnic group from Nepal. It’s not a job description. Plenty of Sherpas work as guides and porters in the Himalayas and they’re incredibly skilled at high altitude work, but using “sherpa” to mean anyone who carries stuff up a mountain is like calling every doctor “a Mayo Clinic.” The word you want is guide, or porter, depending on the role.
Not even close. Endurance actually peaks later than most sports, and experience makes up for slower reflexes. Get a cardio checkup before you start pushing yourself at altitude, train smart, pick objectives that match where your fitness is right now.
AIARE Level 1 is pretty much essential if you’re going anywhere near avalanche terrain. Wilderness First Aid is smart, Wilderness First Responder is even better since you’re operating in remote places where help is hours or days away.


